Hand Laying Track
Hand laid track can be a rewarding element of a model railroad. It allows the modeller to make the track look very much like the prototype.Ties can be placed unevenly and weathered to add realism to the model.By breaking track laying into small segments, it can be easily done by modellers at all levels. The techniques presented here can also be applied to commercial flex track installations.
Assuming that the benchwork is already finished, it is now time to lay out the centre lines for the track.Use a felt tip marker to draw in the final lines. You should have a good feel for what the layout is going to look like now.It is now time to move onto installing the underlay for the roadbed.
Cork Roadbed
Cork roadbed is simple to make yourself. Purchase cork in sheet or bulk format from your local building centre. Remember that the thickness should be slightly more than the distance that a spike will protrude from the bottom of a tie. If the spikes penetrate through the cork into the roadbase, the layout will be noisey. Calculate the finished width of ballast including the slopes at the ends of the ties.Divide this distance in two and cut strips from the cork sheet this width. For On3, I cut strips 1 1/8″ wide. Now, apply contact cement to a workable area along the centre line of your track to a minimum width of two strips of cork.Contact cement one side of the cork and allow to dry until tacky to the touch.Carefully set the strip of cork in place against the centre line and press into place. The other strip of cork can now be put in place.You should now have a base as in Figure 1.
It is now time to cut the edge of the cork to simulate the shape of the ballasted roadbed.Use a sharp knife to cut the sloped edges as in Figure 2. Do not try to be perfect here as it is not necessary. A slightly uneven edge will look good once the ballast is applied.
Ties
To make things easy, I made up a jig for spacing the ties. I used a piece of 1″ x 3″ x 18″ and fastened a guide on one edge. Pieces of wood a little thinner than the thickness of the ties are glued with spacing sufficient to insert ties loosely between then.
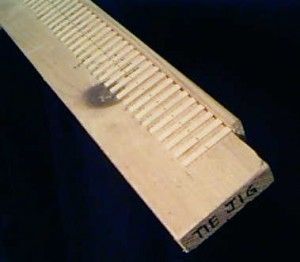
Once the glue dried, I scribed a thin pencil line down the middle of the tie spacers. Ties are placed in the jig up against the edge guide. Place a steel ruler on top of the ties and transfer the centre line from the jig to the ties. Just a light line is needed to align the ties on the cork roadbed. Apply a 1/4″ wide strip of masking tape over the ties leaving the centre line visible. Lift the strip of ties from the jig and hang vertically until you have several strips prepared.
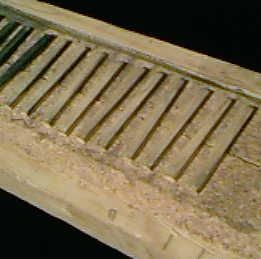
Place 4 thin lines of glue on the cork and lower the strip of ties into place. Align the centre line on the ties with the cut between the two strips of cork. The ties are now located over the centre line previousely drawn on the tabletop. See Figure 3.
Once the glue is dry, lightly plane at a 45° angle with a very sharp blade. A light sanding can also be done to ensure the surface of the ties is nice an level. Now it is the time to weather the ties. A file cleaning card makes a good tool to scratch weathering cracks and splits into the ties.Other modellers have used multiple Xacto blades taped together in a handle.I prefer the file card as it gives random grooves rather than more parallel grooves with the knife blades. Exaggerate the weathering as it tones down a lot once you apply the stain and ballast. Time now to stain the ties. Use a mix of colours to give a varied affect. I use diluted wood stains but have had good results with model ties stains. Others have had success with shoe dies although I do not like the health hazards of the dies getting into your skin. Use enough stain to run down the sides of the ties. Don’t forget to make sure the ends are well coated too. See Figure 4.
Ballast
I ballast in two stages. For the smaller scales, a single layer of ballast will suffice. I start with a filler of play sand once again purchased at the local building supply store. Use a small paper cup squeezed to form a spout to shake the sand over the ties. The sand or ballast should be thinner at the edges to expose the tie ends. Once satisfied, wet the sand with a fine mist sprayer filled with wetted water. Use a few drops of liquid dish soap in a cup of water. The soap breaks the surface tension and allows the glue in the next step to flow into the sand rather than bead up on top.

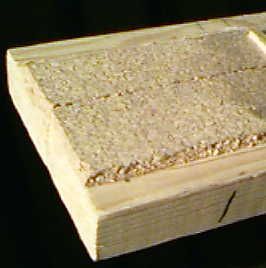
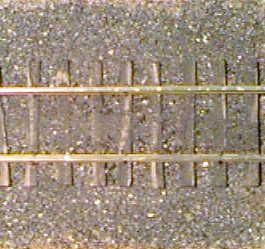
Dilute Lepage’s, Elmer’s or equivalent white carpenter’s glue 50° with water. Use an eye dropper or plastic bottle with a small spout to drop the glue carefully onto the wetted sand. It is surprising how much glue you can use here. Do not be afraid of getting it on the ties. It will dry overnight to a flat finish. You should end up with something looking like Figure 5.
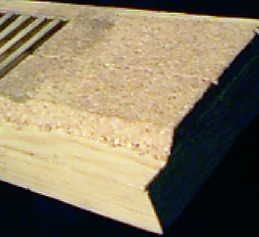
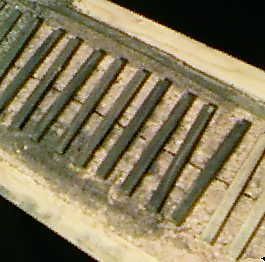
Once the glue has dried, it is time to sprinkle on the finish coat of ballast if you used a sand filler. Be sure to cover down the slopes of the cork. Use a soft brush to clear loose ballast off the top of the ties especially where the rails will be spiked later. If bare spots are exposed during the glueing process, it is easy to go back and fill them in later. Finished ballasting is shown in Figure 6. Notice the cresting of ballast toward the middle of the ties.

Rail is best weathered before installation. RailCraft offer pre-weathered rail which provides a good tooth for additional paint. I used a mix of Floquil ‘roof brown’ and ‘rust’ to give variation to the colour. It is easier to pre-paint the rail at this stage. You may find it more difficult once the rail is in place on top of the ties and ballast.
As emphasized before, spikes should not protruce through the ties into the roadbed base material. If they do, sound will be transmitted to the benchwork and the layout will be noisey. I used 9/32″ long RailCraft spikes with RailCraft Code 80 rail. (The images illustrate Code 100 rail) Do not worry about the spikes feeling slightly loose. Once the final weathering is done to the ballast, the spikes will slightly rust and will hold very well in the ties.

To begin with, tack a length of rail at each end to the ties with spikes. Check the alignment on the ties by using something like the Kemtron 3-point track gauges to hold the second rail in place. Once satisfied, spike the centre of the piece of rail, then work to spike in the middle again until the rail is completely fastenend. I pre-determine the original spacing of spikes so that I end up spiking every fourth tie on Code 80 rail. Install the second rail with the assistance of the 3-point gauges. Use an NMRA Standards Gauge for accuracy. Take enough time to do a quality job as the operational reliability of the models rely on good trackwork.
Final Weathering
Once the rail has been finished, the final touches to the ballast can be done. Sprinkle ashes, cinder, coal and gravel around liberally. Fill above the ties in some yard areas and especially around locomotive shops and service facilities. Use plenty of glue to hold everything in place. Check all areas and re-apply glue to anything that may seem loose. Touch ups done with different ballast, gravel etc. can give a very natrual look to the finished product. See Figure 8.
By following the steps presented here, and with a little experimentation, a very pleasing result can be attained. Trackwork is the base of every model railroad, and without good trackwork, reliable operation can never be accomplished. Take your time doing this stage and the rewards will be well worth the effort.