You may wish to stop here with the backdrops. If you posses artistic talent, you may continue to add detail to the scene. It does not have to be highly detailed as it is just there to give an allusion. There are numerous articles on painting trees and mountains in the major model railroad magazines that you can use for reference.
Get in touch
555-555-5555
mymail@mailservice.com
Scenery is not difficult if you break it down into small steps. Look at each part of building scenery as a separate project. These small projects are easily combined to create the overall effect. Remember, if you are having trouble accomplishing anything in model railroading, consult other modellers when you meet them at the hobby shop, local model railroad club or on prototype outings.
Backdrops
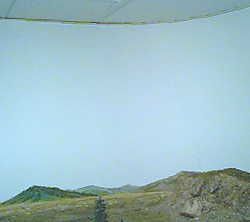
Backdrops can add great dimension to a model railroad. They fill in the background when taking pictures of your model and add realism to the scene. Take the time to finish the walls behind your layout. Corners of the room should be rounded to between 12″ and 18″ radius. I used masonite sheets on the walls and I am very disappointed in the results. The joints are a constant problem with expansion and contraction due to changing humidity from summer to winter. A better solution is to use large sheets of styrene cut to fit the corner. Glue them in place and use drywall mud to smooth in the edges. As an alternative, you can use illustration board from your local stationary store. Keep in mind that we are only using paint on the walls. If you move to another home, it is a simple job to paint the walls back to the way they were before the layout was started.
Paint the walls with a sky blue latex paint. If you wish, blend the blue with white as you approach the horizon. Any uneven paint mix will look like wispy clouds when it all dries. Clouds should now be applied if desired. The dry paint roller technique can be used to “dry brush” the image to the backdrop. Another method is to cut a random edge on a piece of card stock, hold it above the top edge of the desired cloud location close to the wall and spray flat white paint from 8-12″away. Highlight the lower edges of the clouds with grey to give them dimension.
Roughing In
Once you have the roadbed installed, you can start roughing in for the scenery. I suggest that you complete the trackwork in areas that will be difficult to access later. Those areas are tunnels, rock cuts or places that are a long reach. You may choose to complete all trackwork in a section before attempting scenery.

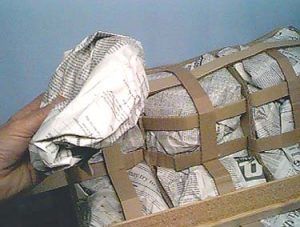
Start by cutting corrugated cardboard to form gussets that can be stapled to the cross members of the benchwork. Using a utility knife, cut these gussets to the general desired shape of your scenery.
Cardboard Lattice Work
Slice some corrugated into strips about an inch wide. Lay these horizontally across the gussets and fasten in place with tape, hot glue or staples.
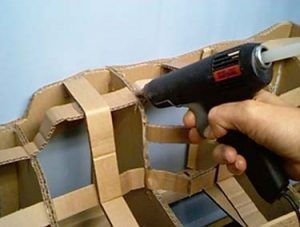
Continue to build a latticework with about 2-3″ spacing. Neatness is not a prerequisite. Remember to allow plenty of space for clearance in rock cuts, tunnels etc.
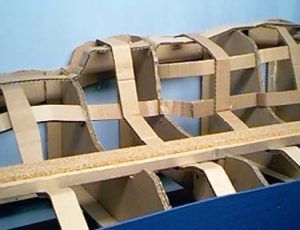
This next step is optional depending on how well your lattice work is supported. If you would like extra support while installing the hardshell, crumple newspaper and stuff it up from the underside to fill the space below the lattice. Use scrap strips of wood as supports. Optionally, some of the crumpled newspaper can be flattened and laid across the surface of the lattice to give it shape. Use the water sprayer to make the paper behave. Shoot some staples from a staple gun in to hold this paper in place.
Leave a little space so as to expose the lattice up against roadbed and fascia so that the hardshell has something to bond to. You are ready for the next step.
Hardshell
Once the mockups are complete, the base hardshell can be started. Hydrocal is a very hard and quick drying plaster. It has tremendous strength when placed over the corrugated base forms. There is much discussion about using brown paper towels to dip into the plaster. In my opinion, leave the towels in the men’s washroom where you found them. Look for some very heavy brown kraft paper as we used to find in abundance in grocery bags.
The heavy kraft paper, when crumpled, will retain some of the crinkles that the washroom paper towels will not do. Tear the paper into 6″ squares in preparation to dipping in the hydrocal. Mix a small amount of hydrocal into a thick soupy consistency. Pre-wet the paper squares so as to not absorb all of the moisture from the hydrocal. Dip the paper into the soup so as to get both sides completely covered. Experience will tell you the right mix. You want it to cover the paper well without running off. Lay the plaster coated paper on the cardboard mockup with a small overlap and allow to cure. Work in small areas so that the hydrocal doesn’t set up in the mixing bowl.
Another method of doing the hardshell is to use plaster impregnated cloth. The cloth material is available at most hobby shops in roll form and can be cut to size, dipped in water and laid directly over the scenery forms. This method has the advantage of being a lot less messy than hydrocal. My observations are that the plaster cloth does not have quite the strength of hydrocal however, the ease of use may be very attractive to modellers.
After hardening overnight, check for good coverage and sufficient strength. You will be surprised how strong this single layer is. If required, reinforce areas as necessary. Be sure to spray water on the dried hydrocal before adding a second layer. If not, the dried hydrocal will suck the water out of the wet plaster. A single layer is usually enough being as you will be adding rock castings and a layer of finishing plaster.
Rocks
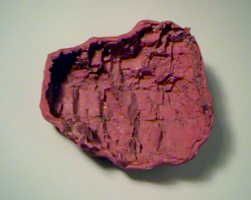
The easiest and fastest method of making rock faces is using latex rubber rock molds. I made about three dozen molds by applying multiple layers of liquid latex rubber to both natural rock surfaces and soft coal. If you wish, you can laminate cheesecloth between the middle layers while making the molds. I prefer to leave this step out and keep the molds very flexible. Make some molds fairly large for ease and speed of installation. Molds 6″ x 8″ are quite satisfactory.
Mix a batch of Plaster of Paris in a bowl. Pour the plaster into the mold, allow to sit momentarily, then apply directly to the pre-wetted hydrocal surface. Have a friend help you with this stage and you need plenty of hands to hold the molds in place until the plaster starts to set. Space the castings such that in the next application, you can overlap these castings with the next set. Peel the molds off the plaster as soon as it sets enough. Quickly clean up the edges of the casting with a knife or sculpting spatula. Now, go back and fill in between with more castings. Once this layer is done, brush Plaster of Paris into the gaps to make a nice joint. A water jet from a spray bottle is a good way to blend this brushed on mixture with the rock castings. The water jet splatters the plaster and makes it look like rubble.
Touch up all joints with your modelling knife so that the crevice lines cross the fill between castings. Ensure all surfaces are covered with a layer of Plaster of Paris before colouring is done.
Hardshell – cont’d….
Once all the plaster has had plenty of time to dry, the fun of bringing your masterpiece to life begins. I refer to the colouring of the castings. Oil based colours are one option, however, I used artist acrylic paints on my layout. I mixed spray bottles of Burnt Sienna, Burnt Umber, Raw Sienna, Raw Umber and Payne’s Gray.
The spray paint should be thick enough to cover the plaster. Acrylic paints dry rapidly and seal the plaster surface so it is important to spray quickly with various colours to get complete coverage. Keep in mind that paint lightens when it dries. Do not be afraid of too much colour. Take a look at how intense the colour of real rock is before you start painting. Go back over your work with a brush to touch up any white plaster that shows through. Washes of Payne’s Gray can be used to emphasize the fractures in the rocks and darken the undersides of overhangs.
Finishing touches can now be put on. Use your favourite materials here. I used natural rock, earth, sand and shale to make the talus slopes and fallen rubble. Fasten it all in place with liberal amounts of white glue and water. Add vegetation in the form of ground foam, shrubs, trees and grasses.Rolling Hills and Flat Surfaces
Rolling hills and flat surfaces are the fastest areas of scenery to complete. Use the rock molds to install rock outcroppings or boulders as desired. Plaster can be painted before application of texturing but is not totally necessary. Start by scattering pebbles and shale that will represent large stones and coarse gravel. Fill in all areas with play sand to form the finished contour. Use the sand to fill in unwanted hollows and to form humps and bumps in the scenery. Liberal amounts of wetted water should be applied along with the water and white glue mix. It is important to ensure the glue penetrates all of the sand especially in the areas where it is deep. Use a second application on areas that are not well secured.
This phase will give you a very good idea what the finished contour will look like. In the next layer, start by spreading natural or commercial finishes such as cinder, gravel, ballast and crushed stone. Add twigs, rotted ties, scraps of weathered wood etc. then scatter mixed grades and colours of ground foam over areas of grass and weeds. Apply glue to hold it all in place.
If you stop right here, you will have a very presentable finished appearance. Further detailing can be done by adding tall grasses, shrubs, bushes and trees to complete the scene.